On the x58 SLI and X58 classified (all versions) there are three controllers on the motherboard
- Intel ICH10R controller
- 6 ports total. Black colored
- Jmicron
- Two separate controllers:
- JMB363
- This controller handles port 8 and 9 on the motherboard. Also controls the IDE controller.
- JMB362
- This controller handles port 6(eSATA) and 7.
The x58 LE and Micro feature only the ICH10R controller.
To configure the ICH10R ports for Raid:
Under the Integrated Peripherals menu locate the OnChip PATA/SATA Device enter the the sub menu. From there locate the SATA Mode and press enter to change it to RAID mode. Please note AHCI is automatically enabled when selecting raid.
Press the F10 button on your keyboard to save and exit your bios and your system will reboot.
When the system is rebooting, the Intel Matrix RAID Storage Manager will appear.
When the Intel Matrix Storage Manager option ROM status screen appears during POST, click Ctrl and i at the same time to enter the Intel Matrix Storage Manager option ROM user interface.
- Click Option 1: Create RAID Volume and click Enter.
- Use the up or down arrow keys to select the RAID level and click Enter.
- Unless you have selected RAID 1, use the up or down arrow keys to select the strip size and click Enter.
- Click Enter to select the physical disks.
- Select the appropriate number of hard drives by using the up or down arrow keys to scroll through the list of hard drives and click Space to select the drive. When finished, click Enter.
- Select the volume size and click Enter.
- Click Enter to create the volume.
- At the prompt, click Y to confirm volume creation.
- Click Option 4: Exit and click Enter.
- Click Y to confirm your exit.
Important notice XP users: Windows XP/XP 64bit only supports a select number of USB floppy drives. Please consult the Microsoft knowledge base article blow regarding this and workarounds.
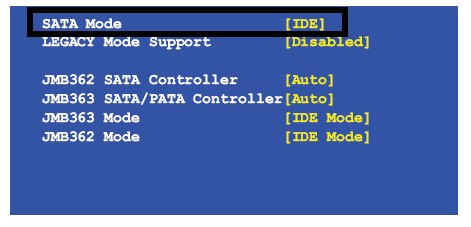
To configure the Jmicron JMB363 ports for Raid:
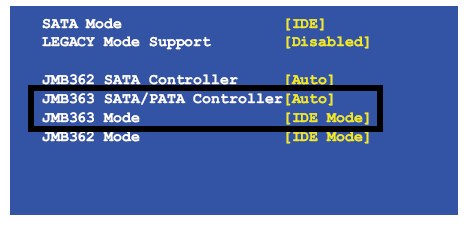
Under the Integrated Peripherals menu locate the OnChip PATA/SATA Device enter the the sub menu. From there locate the JMB3863 and press enter to change it to Enable. Locate the JMB363 mode and set it to RAID+IDE Mode. Press F10 to save the setting and reboot.
When the Jmicron RAID BIOS status screen appears during POST, click Ctrl and J at the same time to enter the Jmicron RAID setup user interface.
- Select Create RAID disk drive
- Enter in the following information (press ENTER to switch between selections)
- Name: (name of RAID array, whatever user desires)
- Level: (0, 1, or JBOD)
- Block (stripe size, 128KB or 64KB is optimal)
- Size (storage capacity of the RAID array)
- Select confirm creation
- Hit Y to create array
- Save and Exit the JMicron RAID Setup