mwparrish
CLASSIFIED Member

- Total Posts : 3278
- Reward points : 0
- Joined: 2009/01/08 15:27:28
- Status: offline
- Ribbons : 23


So heat is the big issue right? Many already know the thermal paste that comes with these cards get crusty after lots of use and is sometimes way too thick to be as effective as it could be. So let's talk about TIM replacement and the GTX 480. Fortunately, TIM replacement is even easier on the GTX 480 that it was on the GTX 280 thanks to the heatsink design of the GTX 480. What you need: - High-Quality TIM -- IC Diamond or MX-2 seems to be preferred. I had to use AS5 because that's all I had on hand.
- 91%+ Alcohol -- Why 91%+? To ensure it evaporates quickly.
- Cotton Swabs -- Grab a handful (or something else that won't leave trace fibers on the surface).
- Post-it Notes -- Any color you like.
- Flat Semi-rigid Plastic Tool -- Like an old credit card.
- Screwdriver -- Probably almost the smallest Phillips head you can find.
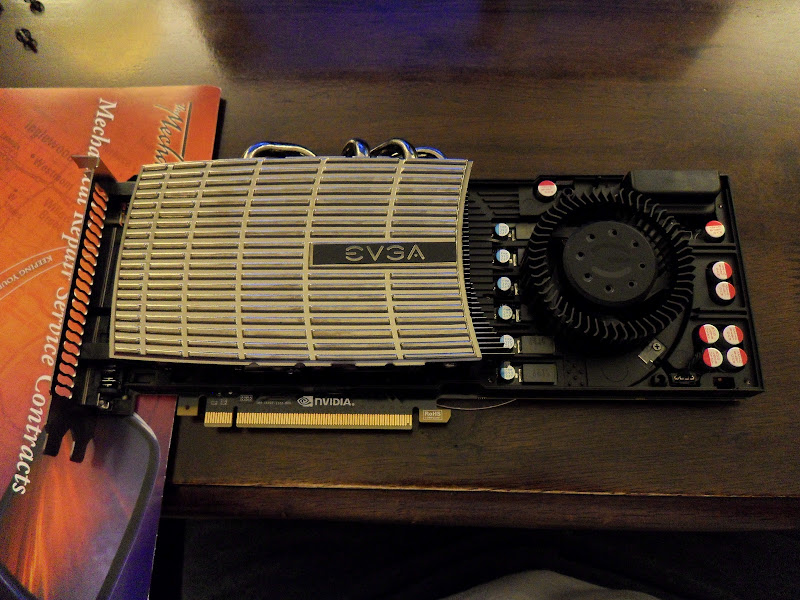
Ok, the nitty gritty. How to replace the TIM: - Remove the GTX 480 shroud by depressing the tabs around the shroud and lifting it away from the PCB. Don't be a bull in a china shop -- but some of the tabs can be a little tight.
- This reveals the entirety of the heatsink, fan, a handful of capacitors, and the lower heatsink that cover the memory and VRMs, etc.
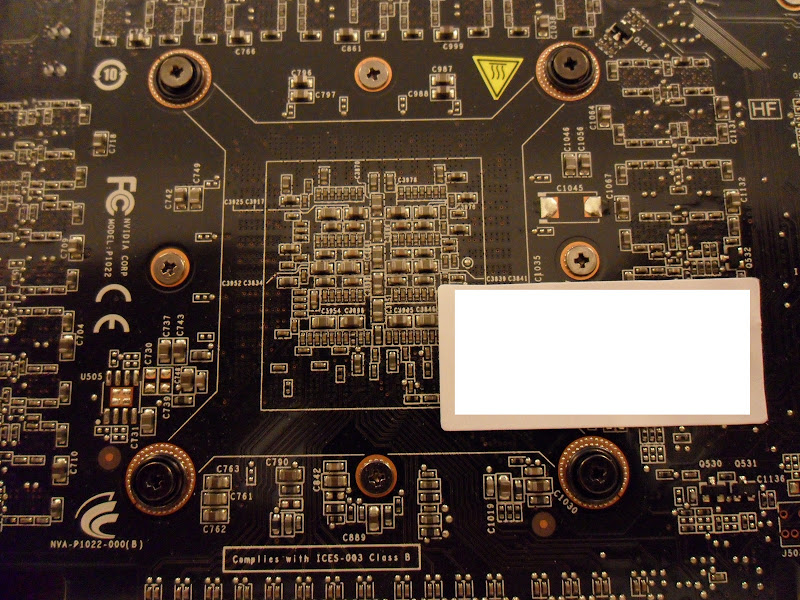
 - You don't need to unhook the fan or worry about thermal pads this time around. Simply flip the card over and remove the four larger spring-loaded screws from the corners of the GPU. These are obviously what is holding on that massive heatsink.
 - Now, with screws removed and set aside (I'm a little OCD so place them in a square in the same position as they were when attached to the board), flip the card back over and remove the heatsink from the PCB. Be very careful not to bend or flex the board when you remove the heatsink! As it turns out, simply rotating the heatsink slightly will loosen the hold of the paste and it will separate with ease.
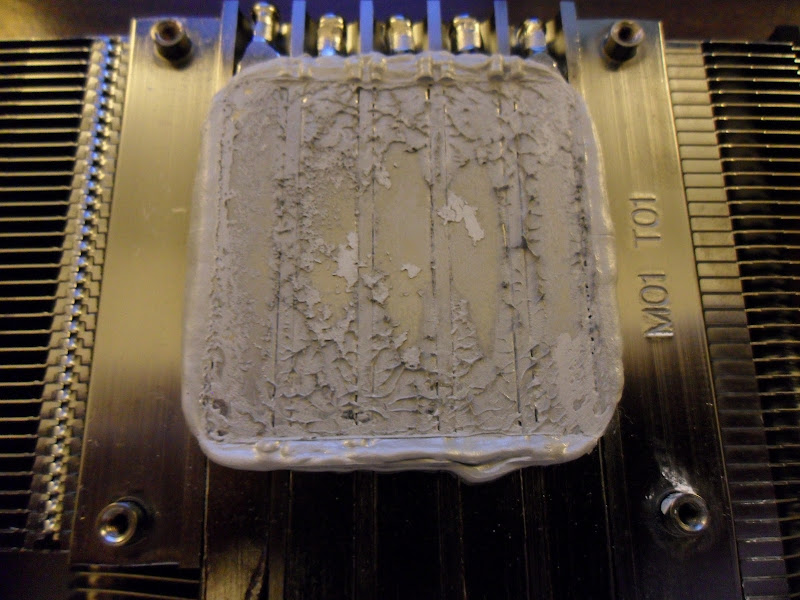
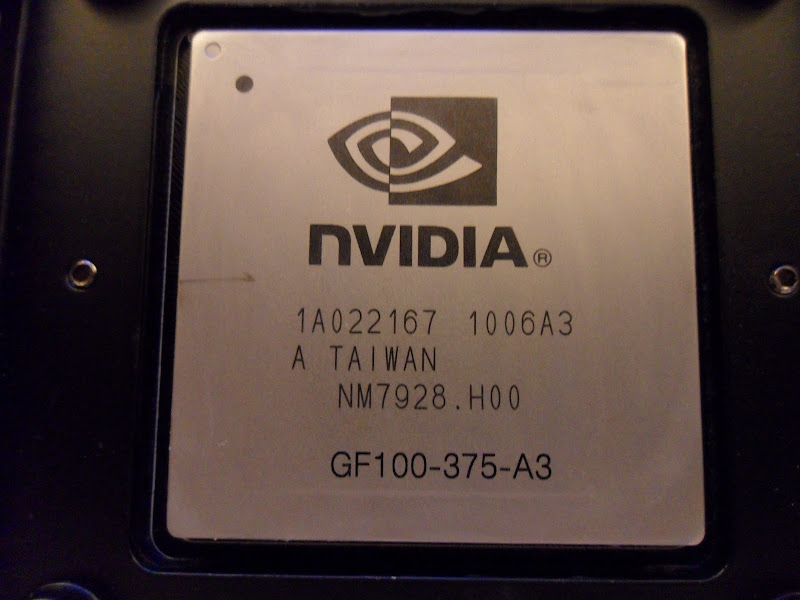
- Ah, here's what we're working with.

 - I recommend taking dry cotton swaps to start with to wipe off all the excess paste from both the heatsink and the GPU.
- Once you get all the thick stuff off, dip the cotton swap in the alcohol and spread it across the surfaces being careful not to let it run off the GPU onto the PCB below. It probably wouldn't hurt much if you did as it would evaporate -- but it's better safe than sorry.
- Take a dry cotton swap and wipe up the alcohol/paste mixture -- it's easy to observe the residue of the paste and the alcohol on the surfaces -- you'll know if you've missed a spot.
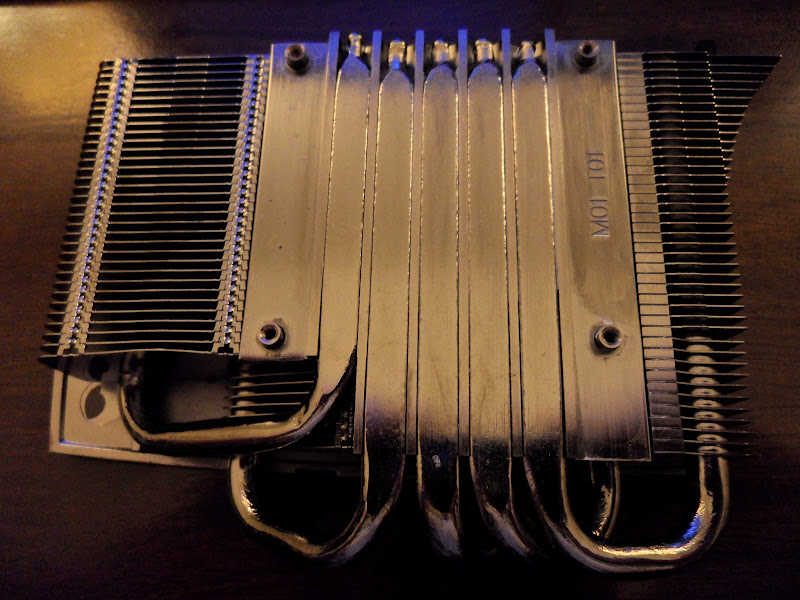
- Take the post-it notes and use the edges to scrap off paste from the grooves of the heat sink pipes and re-apply alcohol and clean off. When you're done it should look like this (she's a beauty ain't she?):
 - Now, to reapply the TIM. With a CPU you want to typically to use the rice grain size method. This is a GPU and it's a much bigger chip. I honestly had to use about 3x the amount you'd use on a CPU. I also recommend spreading it out across the chip with a plastic card. It doesn't have to be perfect -- as you can see, the heatsink itself has grooves that need some extra TIM love -- the little extra that might be on the chip would do nicely to fill in those cracks.
 - Set the heatsink back on top of the chip -- the 4 screw holes line up with the holes around the chip.
- Flip the card back over carefully and start reinstalling the screws. Use the same X-method as you would on a CPU (e.g. start the top-right, then bottom-left, then top-left, then bottom-right). Start each screw only -- do not tighten them down until all the screws have been started in their holes. Take your time with this step so the TIM will spread and fill cracks evenly.
- Reattach the shroud.
You're done! Reinstall the card and fire up Precision -- run the OC Scanner for a bit and monitor temps. If you don't notice an improvement in temps -- that's fine -- some TIMs take time before they reach their peak. As long as your temps are as good as they were before you've done your job. Since these GTX 480s are new, the paste hasn't worn out yet so temperature improvements will be minimal -- but you will be saving yourself the headache of having to do it later once it's all crusty! So how'd I do? I went from idle temps of 49-50*C to 39-42*C. Load temps dropped from 78-80*C to 69-70*C at 92% utilization. Good luck!
post edited by mwparrish - 2010/04/18 06:56:20
Intel Core i7 3930K - 4.7 GHz | ASUS Rampage IV Extreme | 8x4GB G.Skill Ripjaws Z DDR3-2133 2x EVGA GTX 780 Ti SC | BenQ XL2420TX - 1920x1080 120Hz LCD | Logitech G9x | Corsair Vengeance 1500
5x Crucial 128GB SSD | LG BD-R Drive | Danger Den Torture Rack | Enermax Galaxy EVO 1250W 
|
Via Sin Dios
FTW Member
- Total Posts : 1822
- Reward points : 0
- Joined: 2007/05/07 14:18:24
- Status: offline
- Ribbons : 1

Re:TIM Replacement - GTX 480s - DIY How To
2010/04/17 20:30:54
(permalink)
10 degrees? wow i was hearing around only 3 degree differences , pretty nice!
Microcool Banchetto 101 Samsung UN46C8000 LED Intel 2500K @ 4.6 on Water 30c Corsair Vengeance 2x4 gig @ 1600 GTX 1080 TBD EVGA P67 FTW EVGA 1k Watt Seagate barracuda HDD RAID 0 x2 Win 10 http://www.heatware.com/u/63225
|
boredgunner
Over 9000!

- Total Posts : 19181
- Reward points : 0
- Joined: 2008/07/17 19:01:39
- Location: Лиманск-13
- Status: offline
- Ribbons : 79
Re:TIM Replacement - GTX 480s - DIY How To
2010/04/17 20:31:07
(permalink)
Nice guide. Hm, so the cooler uses HDT technology (heat-pipe direct touch). This is a cheaper design that does not absorb heat as well as a regular flat base. But 5 heat pipes... nice for a stock cooler. Obviously it could be better though.
|
JK_DC
iCX Member

- Total Posts : 370
- Reward points : 0
- Joined: 2007/11/01 11:31:14
- Status: offline
- Ribbons : 0
Re:TIM Replacement - GTX 480s - DIY How To
2010/04/17 20:32:53
(permalink)
hmm...I suppose the 470 would be the same way. I may do this later. Nice guide. Would you try some load temps?
Core i7 3820 @ 4.75 1.36v, Prolimatech Mega Shadow push/pull Asrock X79 Extreme 6, 16 GB G. Skill Z Series 1666 7-8-8-24 1T 1.56v EVGA 680 2GB SLI 1272/3200 (1.175v) CM Storm Sniper Blk, CM Silent Power Pro 1000w Creative X-Fi Xtrememusic, Creative G500 5.1 310 watts Intel X25-M G2 80GB, Corsair M4 128GB, WD Caviar Blk 750GBX2, 1.5TB Logitech G510, M705
|
mwparrish
CLASSIFIED Member
- Total Posts : 3278
- Reward points : 0
- Joined: 2009/01/08 15:27:28
- Status: offline
- Ribbons : 23
Re:TIM Replacement - GTX 480s - DIY How To
2010/04/17 20:33:52
(permalink)
boredgunner
Nice guide. Hm, so the cooler uses HDT technology (heat-pipe direct touch). This is a cheaper design that does not absorb heat as well as a regular flat base. But 5 heat pipes... nice for a stock cooler. Obviously it could be better though.
I know it. Cue aftermarket solutions and self-lappers. Via Sin Dios
10 degrees? wow i was hearing around only 3 degree differences , pretty nice!
Well, I had a ton of paste on mine. I'm not sure how this paste thing is handled -- but it could use some better QA!
Intel Core i7 3930K - 4.7 GHz | ASUS Rampage IV Extreme | 8x4GB G.Skill Ripjaws Z DDR3-2133 2x EVGA GTX 780 Ti SC | BenQ XL2420TX - 1920x1080 120Hz LCD | Logitech G9x | Corsair Vengeance 1500
5x Crucial 128GB SSD | LG BD-R Drive | Danger Den Torture Rack | Enermax Galaxy EVO 1250W
|
RBIEZE
CLASSIFIED Member
- Total Posts : 4180
- Reward points : 0
- Joined: 2007/02/21 00:13:33
- Location: Northern Illinois...lurking in the Corn
- Status: offline
- Ribbons : 12
Re:TIM Replacement - GTX 480s - DIY How To
2010/04/17 20:35:10
(permalink)
Nice job on the tutorial.
Its always a good laugh to so how much excess thermal paste is applied at the factory ,your pics show that quite well.
Thats the exact reason I always pull apart new cards and apply a good coating of quality thermal paste ,it seems the factory is unable to accomplish this themselves...
They say opposites attract. I hope you meet someone who is good-looking, intelligent, and cultured. http://www.youtube.com/watch?v=W2WsPN-rr9o Evga X58 4Way sli,W'Cooled i7 950 @3.8, Mushkin redline mem @6-7-6-18 1600Mhz, 2-Evga GTX770 Sli, Evga Gtx460 Physx, Corsair Neutron 120GB SSD,Samsung 240SSD, W.D Black 640GB /Corsair TX950 Psu, Hanns-G 28" Lcd, Logitech G540 5.1 Surround My Affiliate Code: EECLVEDV7Z 
|
JDookie
FTW Member
- Total Posts : 1985
- Reward points : 0
- Joined: 2009/06/22 10:49:19
- Status: offline
- Ribbons : 5
Re:TIM Replacement - GTX 480s - DIY How To
2010/04/17 20:35:17
(permalink)
Thanks for the how-to. I'll be doing this tomorrow, except with some Shin Etsu X23 (much better than AS5, btw, and won't short anything out like AS5 can).
Another method to apply AS5 that I like to do is to just use a plastic baggie like a small "snack bag" or something stretched over your finger, and spread it real thin over the entire cpu/gpu. You get a thinner layer this way vs. using a plastic card. At least, that's what I've found.
i7 3770K @ 4.8GHz (Koolance CPU-380i water block) Gigabyte Z77X-UP7 2 x 8GB Corsair Dominator Platinum C9 1866MHz Dual 240GB Corsair Neutron GTX in RAID 0 EVGA GTX 780 Ti Classified K|NGP|N w/ EK water block Corsair AX1200 Dell 30" 2560x1600 U3011 Monitor Koolance ERM-2K3U (copper) external cooler Corsair SP2500 2.1 Speakers | Win7 x64
|
deicida
CLASSIFIED Member
- Total Posts : 2769
- Reward points : 0
- Joined: 2009/01/15 10:49:40
- Location: Ireland
- Status: offline
- Ribbons : 27
Re:TIM Replacement - GTX 480s - DIY How To
2010/04/17 20:35:25
(permalink)
Nice guide!  You were right it does seem a lot simpler than on previous cards, the last one I did was a 9800GX2 and it was a pain.
HAF 932 EVGA X58 E760 i7 920 D0 @ 4GHz Swiftech Apogee GTz G.Skill Trident 6GB @ 1900MHz PoV GTX 480 2x640GB WD Caviar Black(raid-0) Corsair HX850 
|
kram36
The Destroyer
- Total Posts : 21477
- Reward points : 0
- Joined: 2009/10/27 19:00:58
- Location: United States
- Status: offline
- Ribbons : 72
Re:TIM Replacement - GTX 480s - DIY How To
2010/04/17 20:39:27
(permalink)
I don't get it. They use this big heatsink and it looks like only 3 heatpipes worth of area is making good contact.
|
mwparrish
CLASSIFIED Member
- Total Posts : 3278
- Reward points : 0
- Joined: 2009/01/08 15:27:28
- Status: offline
- Ribbons : 23
Re:TIM Replacement - GTX 480s - DIY How To
2010/04/17 20:44:01
(permalink)
I updated the original post with load temps! kram36
I don't get it. They use this big heatsink and it looks like only 3 heatpipes worth of area is making good contact.
Well, the chip is hottest in the center which is why it's more crusty there but it makes clear contact across all the pipes. Just where it's not as hot it doesn't get as cruddy. RBIEZE
Nice job on the tutorial.
Its always a good laugh to so how much excess thermal paste is applied at the factory ,your pics show that quite well.
Thats the exact reason I always pull apart new cards and apply a good coating of quality thermal paste ,it seems the factory is unable to accomplish this themselves...
Here's the other 480! It was even worse!   jdookie
Thanks for the how-to. I'll be doing this tomorrow, except with some Shin Etsu X23 (much better than AS5, btw, and won't short anything out like AS5 can).
Another method to apply AS5 that I like to do is to just use a plastic baggie like a small "snack bag" or something stretched over your finger, and spread it real thin over the entire cpu/gpu. You get a thinner layer this way vs. using a plastic card. At least, that's what I've found.
Yeah, that's a great idea! I actually used the pop-off tab from a compressed air can since I was in a bit of a rush. I would say for this though -- smooth as a baby's rear isn't necessary unless you've lapped the heatsink though.
Intel Core i7 3930K - 4.7 GHz | ASUS Rampage IV Extreme | 8x4GB G.Skill Ripjaws Z DDR3-2133 2x EVGA GTX 780 Ti SC | BenQ XL2420TX - 1920x1080 120Hz LCD | Logitech G9x | Corsair Vengeance 1500
5x Crucial 128GB SSD | LG BD-R Drive | Danger Den Torture Rack | Enermax Galaxy EVO 1250W
|
heymike_s
CLASSIFIED Member
- Total Posts : 2469
- Reward points : 0
- Joined: 2008/03/07 18:35:38
- Location: Palmdale, CA
- Status: offline
- Ribbons : 10
Re:TIM Replacement - GTX 480s - DIY How To
2010/04/17 20:58:31
(permalink)
No stupid pads to deal with.. I love it!
|
JK_DC
iCX Member
- Total Posts : 370
- Reward points : 0
- Joined: 2007/11/01 11:31:14
- Status: offline
- Ribbons : 0
Re:TIM Replacement - GTX 480s - DIY How To
2010/04/17 21:02:15
(permalink)
I may wait for an aftermarket heatsink and do it all at once. I would like to put a 480 heatsink on the 470. lol
Core i7 3820 @ 4.75 1.36v, Prolimatech Mega Shadow push/pull Asrock X79 Extreme 6, 16 GB G. Skill Z Series 1666 7-8-8-24 1T 1.56v EVGA 680 2GB SLI 1272/3200 (1.175v) CM Storm Sniper Blk, CM Silent Power Pro 1000w Creative X-Fi Xtrememusic, Creative G500 5.1 310 watts Intel X25-M G2 80GB, Corsair M4 128GB, WD Caviar Blk 750GBX2, 1.5TB Logitech G510, M705
|
daveyd007
FTW Member
- Total Posts : 1269
- Reward points : 0
- Joined: 2010/03/02 18:27:32
- Location: Seattle, Washington
- Status: offline
- Ribbons : 5
Re:TIM Replacement - GTX 480s - DIY How To
2010/04/17 21:07:59
(permalink)
Nice writeup, pics and all! With some pretty decent results too!
I hope a moderator will come by and give you a Blue Ribbon as this thread is well deserving of one.
Cheers! ;)
- SYSTEM SPECS- ASUS Rampage Extreme III • Core I-7 980x @ 4.8Ghz w/ stock CPU cooler• 24Gb Patriot VIPER Extreme DDR3 2000Mhz • GTX 570 in 3-way SLi • TWO Intel X-25V SSD's in RAID-0 (c-drive)• Six Intel X-25M SSD's in RAID-0 (d-drive) • 10X BluRay by LG • CoolerMaster SilentPro GOLD 1200W • Antec Dark Fleet (DF-85) Full Tower Chasis • RAZER Lycosa Keyboard RZ03 • Logitech G-500 Laser mouse • BOSE Companion 5 - 5.1 Surround Sound • UltraSlim 55" SAMSUNG L.E.D. Display 3DMARK VANTAGE SCORE - P 56,801 @ 4.76Ghz 800/2000 AIDA64 Cache & Memory Benchmark @ 4.8Ghz Click here to see my overclocked car PC.
|
zschopf1
New Member

- Total Posts : 59
- Reward points : 0
- Joined: 2007/10/05 07:07:12
- Status: offline
- Ribbons : 0
Re:TIM Replacement - GTX 480s - DIY How To
2010/04/17 21:19:50
(permalink)
My Xfire is rant72! Play FPS games? Co-op games? we have a lot in common. =) "My what big GPU's you have!" "All the better Crank that S#!% UP!" "My what big monitors you have!" "All the better to watch my enemies die!"
|
mwparrish
CLASSIFIED Member
- Total Posts : 3278
- Reward points : 0
- Joined: 2009/01/08 15:27:28
- Status: offline
- Ribbons : 23
Re:TIM Replacement - GTX 480s - DIY How To
2010/04/17 21:55:54
(permalink)
Intel Core i7 3930K - 4.7 GHz | ASUS Rampage IV Extreme | 8x4GB G.Skill Ripjaws Z DDR3-2133 2x EVGA GTX 780 Ti SC | BenQ XL2420TX - 1920x1080 120Hz LCD | Logitech G9x | Corsair Vengeance 1500
5x Crucial 128GB SSD | LG BD-R Drive | Danger Den Torture Rack | Enermax Galaxy EVO 1250W
|
mwparrish
CLASSIFIED Member
- Total Posts : 3278
- Reward points : 0
- Joined: 2009/01/08 15:27:28
- Status: offline
- Ribbons : 23
Re:TIM Replacement - GTX 480s - DIY How To
2010/04/18 06:39:44
(permalink)
Well, I can now confirm, after much testing, that both my cards now run within 1-2*C of each other whereas before one of my 480s ran ~12*C hotter than the other without explanation. So without a doubt, TIM replacement helped in this situation. Now we'll just have to see if it increased my OC headroom. heymike_s
No stupid pads to deal with.. I love it!
Yeah, that was definitely the best part for me. I really loathed having to watch out for creating a new heat issue in the process of trying to fix 1 heat issue!
Intel Core i7 3930K - 4.7 GHz | ASUS Rampage IV Extreme | 8x4GB G.Skill Ripjaws Z DDR3-2133 2x EVGA GTX 780 Ti SC | BenQ XL2420TX - 1920x1080 120Hz LCD | Logitech G9x | Corsair Vengeance 1500
5x Crucial 128GB SSD | LG BD-R Drive | Danger Den Torture Rack | Enermax Galaxy EVO 1250W
|
chizow
CLASSIFIED ULTRA Member

- Total Posts : 5355
- Reward points : 0
- Joined: 2007/01/27 20:15:08
- Status: offline
- Ribbons : 30
Re:TIM Replacement - GTX 480s - DIY How To
2010/04/18 06:58:43
(permalink)
Great looking guide! Definitely BR worth!
Was debating changing out the TIM myself but my GPU temps haven't really bothered me yet. Although dropping temps and allowing for lower fanspeed would always be welcome, I don't think GPU temps are holding back my OC. I still think its the VRMs which this won't help with, there's only little thermalpads underneath there and I don't want to mess with them until I can see their temps definitively.
Anyways, lookin forward to more results with OC'ing and more feedback on temps, but ya overall this is a MUCH easier process than replacing the TIM on the 280. No backplate, don't need to remove the entire heatsink and no pads.
Intel Core i7 5930K @4.5GHz | Gigabyte X99 Gaming 5 | Win8.1 Pro x64 | Corsair H105
2x Nvidia GeForce Titan X SLI | Asus ROG Swift 144Hz 3D Vision G-Sync LCD | 2xDell U2410 | 32GB Acer XPG DDR4 2800
Samsung 850 Pro 256GB | Samsung 840EVO 4x1TB RAID 0 | Seagate 2TB SSHD
Yamaha VSX-677 A/V Receiver | Polk Audio RM6880 7.1 | LG Super Multi Blu-Ray
Auzen X-Fi HT HD | Logitech G710/G502/G27/G930 | Corsair Air 540 | EVGA SuperNOVA P2 1200W
|
Hog54
CLASSIFIED Member
- Total Posts : 3695
- Reward points : 0
- Joined: 2008/12/12 14:54:28
- Status: offline
- Ribbons : 2
Re:TIM Replacement - GTX 480s - DIY How To
2010/04/18 07:15:23
(permalink)
Im wondering why they even bothered to paint the heatpiped on the underside?I would think it would of cooled better with bare copper.If I owned one of these cards and I had the heatsink off,I would be tempted to sand the paint off the heatpipes on that contact area to see if it made any difference.
AMD PhenomII 1090T@ 3.6 Corsair H50 cooler Asus M3N72-D board Evga GTX460 SC 1GB 4 gb G-skill PC8500 @1066 G-skill Sniper 120 GIG SSD Corsair HX650 Windows7 Ultimate 64bit\
|
rjohnson11
EVGA Forum Moderator

- Total Posts : 102323
- Reward points : 0
- Joined: 2004/10/05 12:44:35
- Location: Netherlands
- Status: offline
- Ribbons : 84
Re:TIM Replacement - GTX 480s - DIY How To
2010/04/18 07:16:29
(permalink)
Yes, definitely worth a BR and a BR is awarded
|
JDookie
FTW Member
- Total Posts : 1985
- Reward points : 0
- Joined: 2009/06/22 10:49:19
- Status: offline
- Ribbons : 5
Re:TIM Replacement - GTX 480s - DIY How To
2010/04/18 08:14:05
(permalink)
Just replaced the TIM on my two cards, and even though it's still curing, idle temps are 3C lower on both cards, but then again, it is about 3C cooler in my office now than it was last night, soooo, I don't know if it made any difference just yet. Proper cure time, and load temps may tell a different story.
i7 3770K @ 4.8GHz (Koolance CPU-380i water block) Gigabyte Z77X-UP7 2 x 8GB Corsair Dominator Platinum C9 1866MHz Dual 240GB Corsair Neutron GTX in RAID 0 EVGA GTX 780 Ti Classified K|NGP|N w/ EK water block Corsair AX1200 Dell 30" 2560x1600 U3011 Monitor Koolance ERM-2K3U (copper) external cooler Corsair SP2500 2.1 Speakers | Win7 x64
|
rebelranger
New Member
- Total Posts : 69
- Reward points : 0
- Joined: 2006/05/26 20:18:38
- Location: Northern CA
- Status: offline
- Ribbons : 0
Re:TIM Replacement - GTX 480s - DIY How To
2010/04/18 10:13:56
(permalink)
Awesome...Thanks I've got my stuff ready -- gonna use my IC Diamond paste since I have a few tubes of that, and will do this on my cards today. A well deserved BR!
X58 E760, i7 920 DO, @4.8 Heatkiller 3.0 Bitspower Black Ice NB/Mosfet XSPC RX 480 Quad MCP655 EK-RES 250 KAZE MASTER, Xonar Essence STX, Patriot Viper Xtreme DDR3 12 GB (3 x 4 GB)2000MHz, Intel x25M 160GB, Kingston 128GB, 3x2TB WD, Pioneer & LG blu-ray Galaxy GTX 680 4GB SLI Win7 64bit Silverstone Strider 1500 - TJ07  
|
jjarrette
Superclocked Member

- Total Posts : 136
- Reward points : 0
- Joined: 2005/12/28 15:44:05
- Status: offline
- Ribbons : 0
Re:TIM Replacement - GTX 480s - DIY How To
2010/04/18 10:25:41
(permalink)
Excellent guide BTW!!! I was considering doing this to my 480 now that I see steps to do it, what's anyone's opinion on Arctic Alumina compound? I just happen to have a tube of this stuff sitting around less than 1 year old. http://www.arcticsilver.com/arctic_alumina.htm
EVGA X58 SLI Motherboard - EVGA GTX 590 Classified - 12GB OCZ XMP - Core I7 920/LGA 1366 - OCZ Vertex 2 240GB - BFG EX-1200 PSU - (3) Samsung Syncmaster B2330 w/Nvidia Surround @ 6120x1080.
|
YerBuddy
Omnipotent Enthusiast

- Total Posts : 8919
- Reward points : 0
- Joined: 2005/08/25 09:55:57
- Location: Classified
- Status: offline
- Ribbons : 59
Re:TIM Replacement - GTX 480s - DIY How To
2010/04/18 10:28:34
(permalink)
|
transdogmifier
CLASSIFIED ULTRA Member
- Total Posts : 6116
- Reward points : 0
- Joined: 2003/09/05 14:26:21
- Location: Orlando, Fl
- Status: offline
- Ribbons : 17
Re:TIM Replacement - GTX 480s - DIY How To
2010/04/18 12:39:24
(permalink)
Nice, Parrish....man, whoever decides how much TIM to use needs to be re-trained..that's a ton.
AMD Ryzen 7900x3d Deepcool LT720 Gigabyte Aorus Elite AX X670 (Might change..don't like this board) eVGA GeForce RTX 3090 FTW3 Ultra Gaming (Hybrid kit on it) Asus ROG Swift PG43UQ 4k Monitor eVGA 1600W Supernova T2 PSU 32GB Kingston 6000 DDR5 (2x16GB) Fury Corsair MP600 Pro 2TB (Boot) Corsair MP600 2TB (Games/Data) Phanteks P500A Case
|
ezra_metal
New Member
- Total Posts : 37
- Reward points : 0
- Joined: 2008/05/05 15:28:51
- Status: offline
- Ribbons : 0
Re:TIM Replacement - GTX 480s - DIY How To
2010/04/18 12:40:56
(permalink)
nice guide. I'm glad that the shroud and heatsink is easier to remove than my previous GTX260.
i7 930 @ 4.2 1.325V w/ push-pull Megahalem cooler EVGA X58 SLI 6GB G-Skill DDR3-1600 8-8-8-24 1.6V 2*EVGA GTX 480 in SLI 2*300GB Velociraptor (raid 0) Corsair TX850W psu HAF 922 Windows 7 Professional
|
_Nite_
Insert Custom Title Here
- Total Posts : 19175
- Reward points : 0
- Joined: 2007/04/18 15:35:04
- Location: Sumner, Washington
- Status: offline
- Ribbons : 46
Re:TIM Replacement - GTX 480s - DIY How To
2010/04/18 12:46:44
(permalink)
Nice to see that the heatsinks are much easier to take off than on the 200 series cards, don't have to worry about the pads that were over the ram chips.
Gaming Rig: AMD Ryzen 7 2700x @ 4.25Ghz - Asrock B450 Pro 4 - 16GB Crucial Ballistix DDR4 3000 - 240GB SSD (OS), 1TB ADATA SU800 SSD and 2TB ADATA SX8200 Pro M2 NVME (Games) - 8GB RTX 3070 XC3 Ultra - Sound Blaster Audigy 5 RX - EVGA Supernova 750w G2 - Antec 302 - 24" Asus VG248QE
|
mwparrish
CLASSIFIED Member
- Total Posts : 3278
- Reward points : 0
- Joined: 2009/01/08 15:27:28
- Status: offline
- Ribbons : 23
Re:TIM Replacement - GTX 480s - DIY How To
2010/04/18 12:49:26
(permalink)
chizow
Great looking guide! Definitely BR worth!
Was debating changing out the TIM myself but my GPU temps haven't really bothered me yet. Although dropping temps and allowing for lower fanspeed would always be welcome, I don't think GPU temps are holding back my OC. I still think its the VRMs which this won't help with, there's only little thermalpads underneath there and I don't want to mess with them until I can see their temps definitively.
Anyways, lookin forward to more results with OC'ing and more feedback on temps, but ya overall this is a MUCH easier process than replacing the TIM on the 280. No backplate, don't need to remove the entire heatsink and no pads.
Yes, I notice that anytime I want to go all out at higher clocks (1550 or higher) and stock voltages -- before temps get anywhere near the 90s I get a lock up or a driver crash even when I adjust voltage to 1.1 or so. I think the VRMs are really juiced hard and in desperate need of additional cooling. I noticed my memory runs fine at least up to 2100mhz (4200 effective) and I believe those Samsung chips max at 2500mhz (5000 effective). Good luck getting that going though with all the apparent VRM heat. The water cooling kids will have the best luck since the blocks also help to cool the VRMs too, I believe. Hog54
Now that I see the way they come apart im thinking maybe thats why these run a little hotter than 200 series.The heatsink doesnt contact the memory chips or the voltage chips at all.Just the plate that holds on the fan shroud.
Yep. I guess it was give and take though. It keeps the chip sufficiently cool and the memory doesn't appear to get too hot. It's just the VRMs -- apparently. I'm getting a temp gun this week so hopefully I can isolate the source of the heat definitively then plot a suitable remedy. The key will be cooling that plate. Heck, without separating the plate from the PCB who knows if the pads are even making sufficient contact! I can only assume they are. But I'm not so keen on tearing that down. I'll let someone else volunteer! I'll just chill some air with dry ice and pump it into the cards instead if I'm desperate for some higher benches.
Intel Core i7 3930K - 4.7 GHz | ASUS Rampage IV Extreme | 8x4GB G.Skill Ripjaws Z DDR3-2133 2x EVGA GTX 780 Ti SC | BenQ XL2420TX - 1920x1080 120Hz LCD | Logitech G9x | Corsair Vengeance 1500
5x Crucial 128GB SSD | LG BD-R Drive | Danger Den Torture Rack | Enermax Galaxy EVO 1250W
|
sancheuz
New Member
- Total Posts : 10
- Reward points : 0
- Joined: 2010/04/14 13:40:17
- Status: offline
- Ribbons : 0
Re:TIM Replacement - GTX 480s - DIY How To
2010/04/18 15:54:02
(permalink)
Okay followed tutorial down to the wire... even used artic silver 5 just as in tutorial. So far temps are the same as before... maybe just 1 or 2 degrees cooler. I'm getting lower 80's idle (dual monitors) and lower to mid 90's load at around ~89% fan speed.
|
Hog54
CLASSIFIED Member
- Total Posts : 3695
- Reward points : 0
- Joined: 2008/12/12 14:54:28
- Status: offline
- Ribbons : 2
Re:TIM Replacement - GTX 480s - DIY How To
2010/04/18 16:13:30
(permalink)
You know nvidia may say its alright but all I can think of is water boils at 100c when I see these temps you guys are getting on these cards. 
AMD PhenomII 1090T@ 3.6 Corsair H50 cooler Asus M3N72-D board Evga GTX460 SC 1GB 4 gb G-skill PC8500 @1066 G-skill Sniper 120 GIG SSD Corsair HX650 Windows7 Ultimate 64bit\
|
TrekCZ
iCX Member
- Total Posts : 417
- Reward points : 0
- Joined: 2008/12/03 03:02:38
- Status: offline
- Ribbons : 1
Re:TIM Replacement - GTX 480s - DIY How To
2010/04/18 16:19:35
(permalink)
Hog54
water boils at 100c
It depends on pressure too. In vacuum it is only cca 25c or so, so if someone would be in vacuum he would effervesce in room temperature.
|